Well for the last couple of months I've been busy doing an engine conversion. This was something I was considering anyway but after my TD engine died completely (siezed, suspected cracked head/block etc) the decision was made for me!
Below is a complete guide of how I did it and I've created a PDF file of the process that includes some pictures too. Hopefully this will help other people out thinking of doing the same.
You can download the PDF version at http://www.appware.co.uk/static/landy/200tdiconversion.pdf
Cheers
Richard
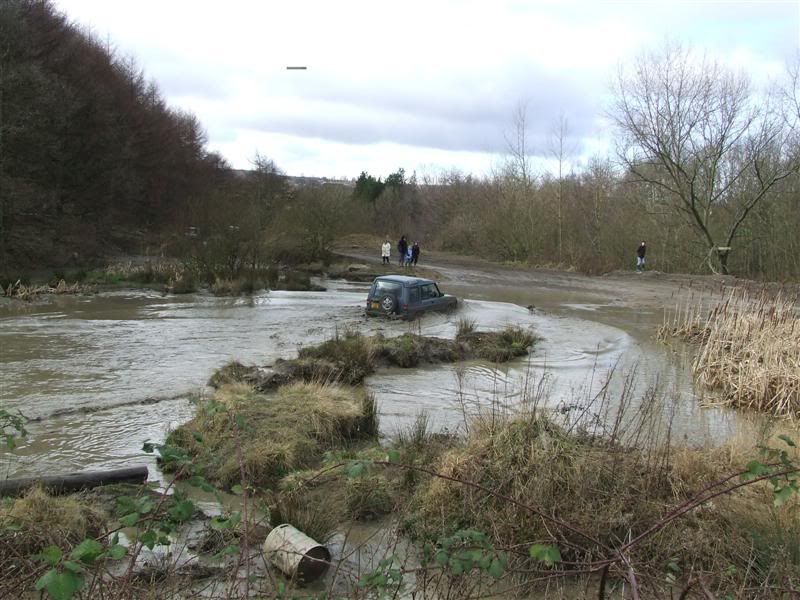
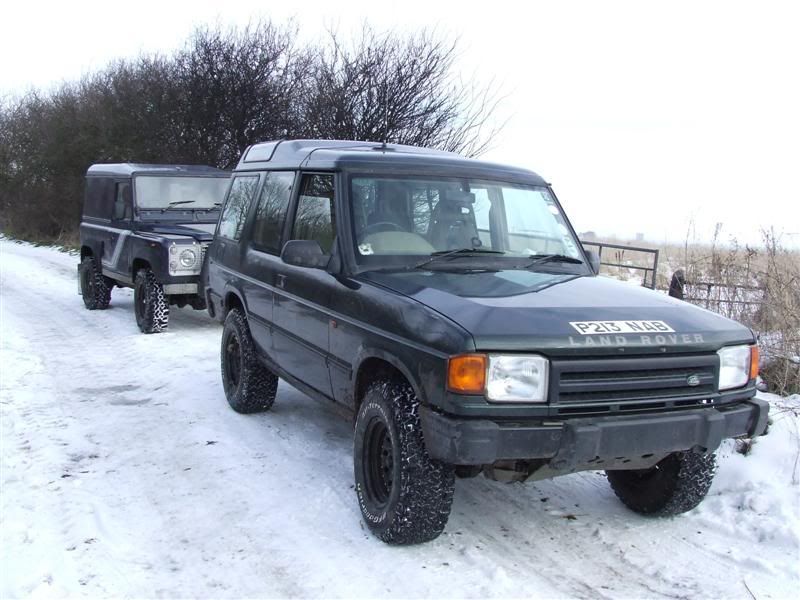
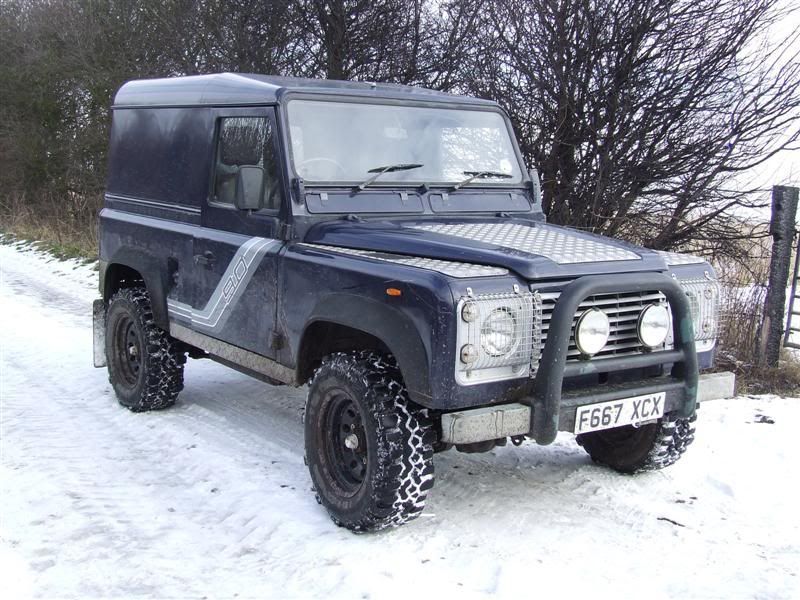
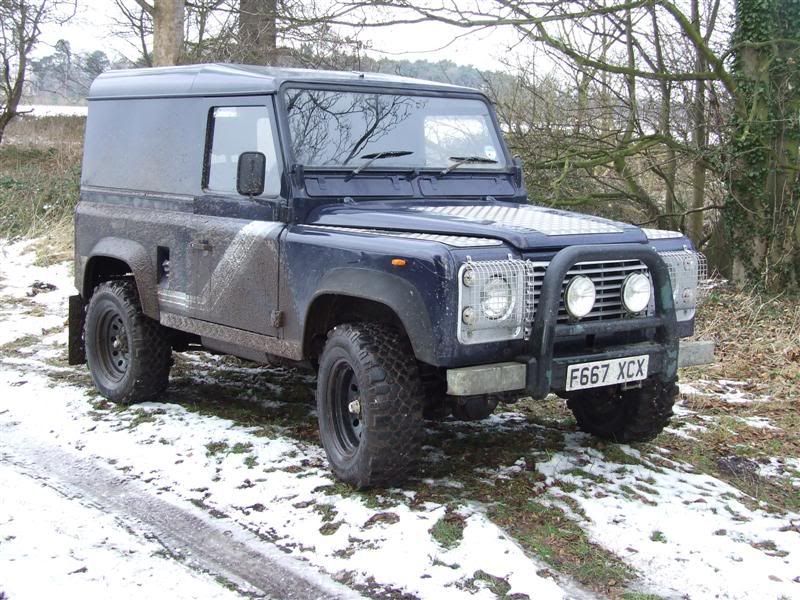
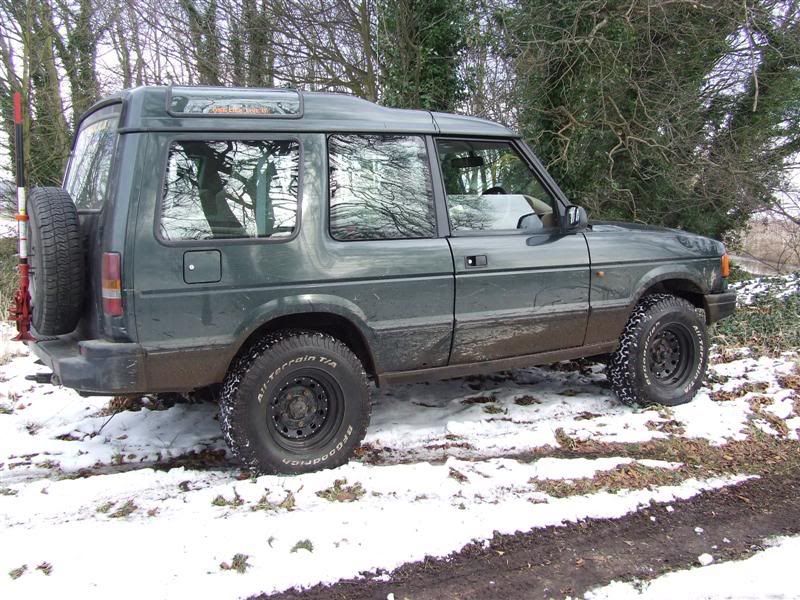
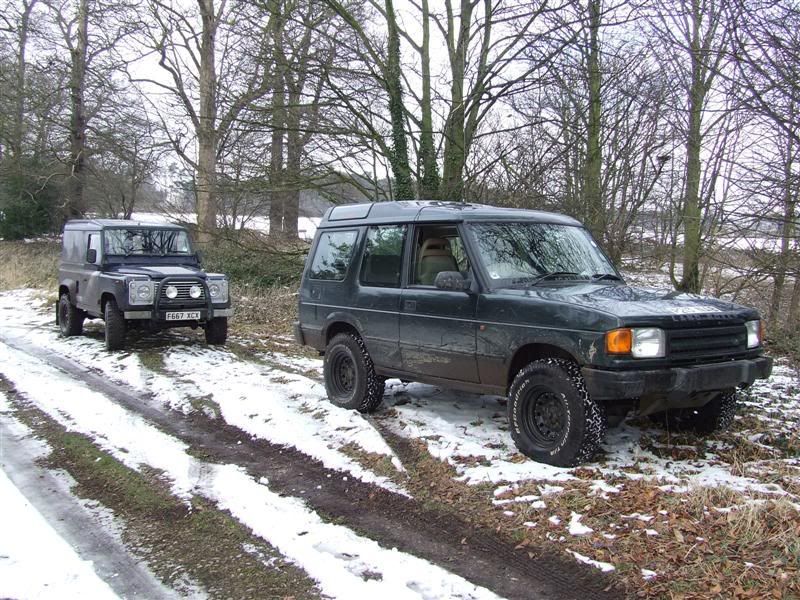
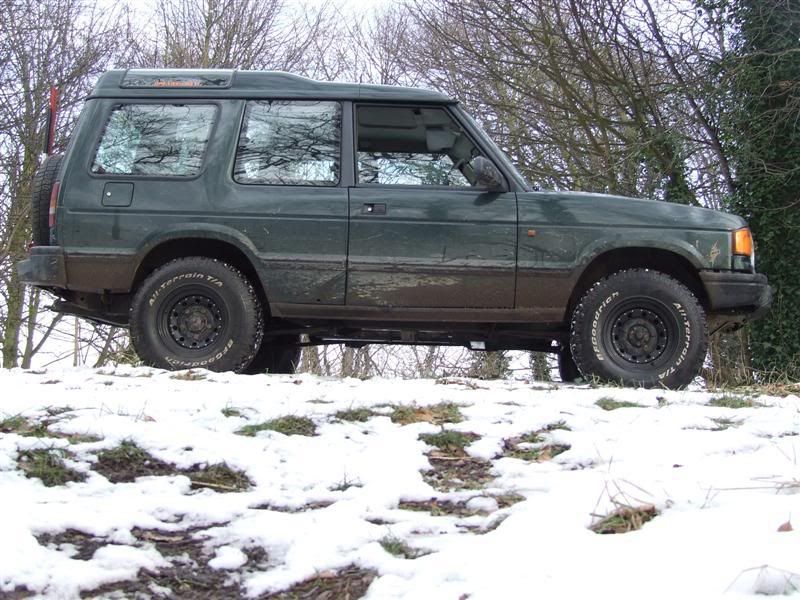
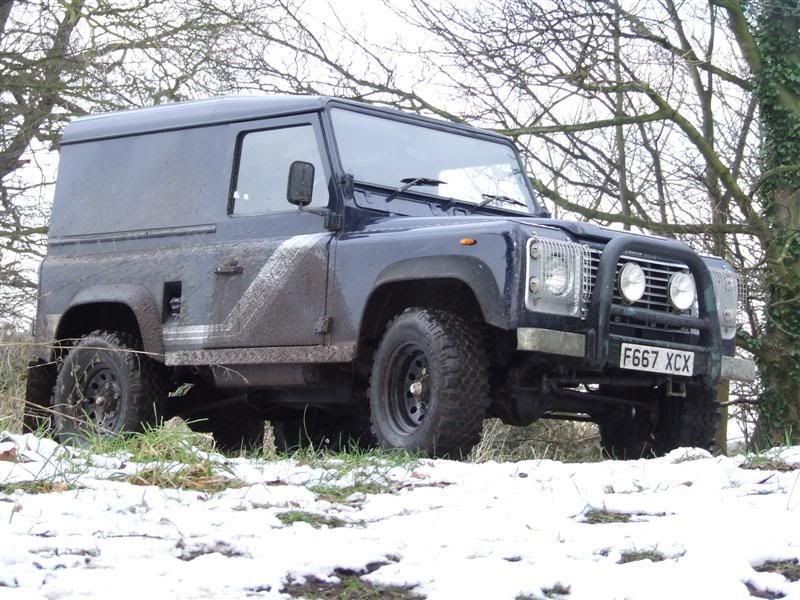
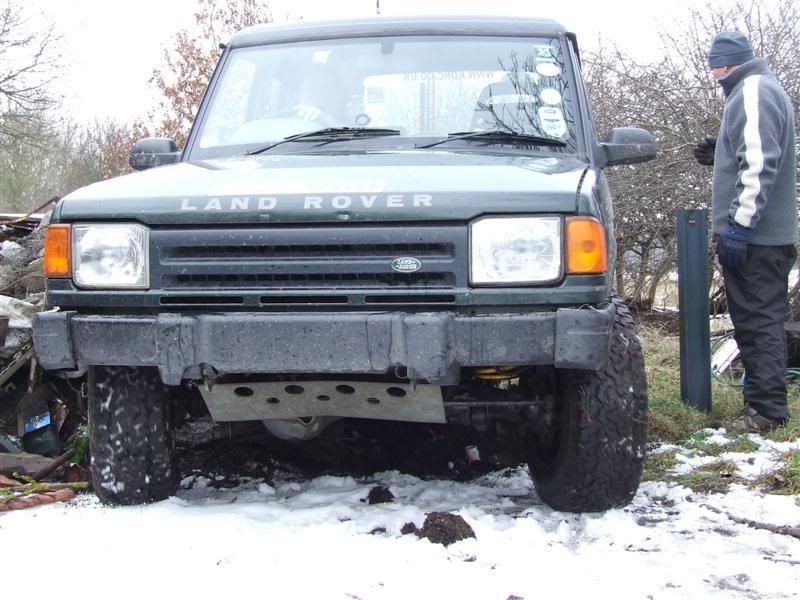
Land Rover 90 TD to Discovery 200TDi Engine Conversion
Parts Required
* Land Rover 90 TD
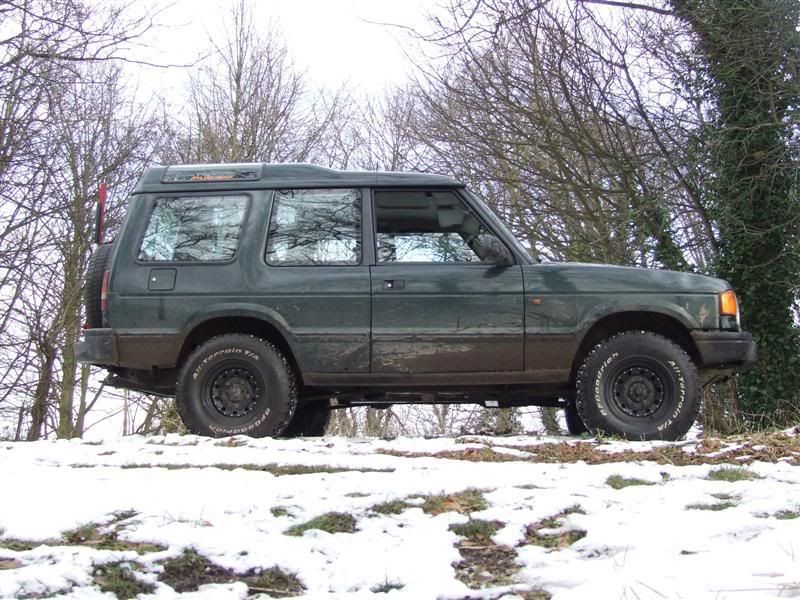
* MOT failure Land Rover Discovery 200TDi
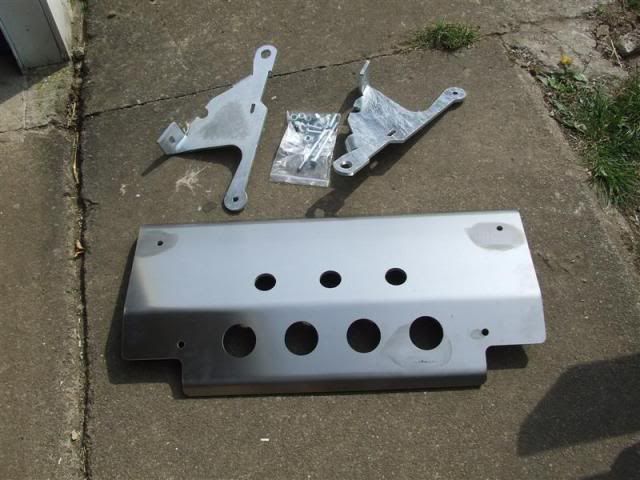
* Disco conversion downpipe
* Disco conversion intercooler pipes
* Extended 200TDi oil cooler pipes
* New rear crank oil seal
* New clutch (clutch and release bearing)
* New heavy duty clutch arm
* New alternator and power steering belt
* New filters and gaskets
Conversion Process
Work to do to 90
* Disconnect battery and remove
* Remove bonnet
* Disconnect bonnet stay, bonnet then lifts all the way back and can be lifted off hinges
* Remove front bumper, grille, and front centre panel
* Drain coolant
* Disconnect bottom radiator hose and drain all coolant
* Remove air cleaner assembly, fan, fan cowl, and radiator
* Remove turbo heat shield and loosen exhaust downpipe at first connection
* Remove heater hoses and control cables from clips on rocker cover
* Remove breather pipes from rear lifting bracket
* Disconnect fuel pipe connections - remove fuel feed to injection pump, spill return from no 4 injector, fuel feed to lift pump, lift pump to fuel filter
* Disconnect throttle cable and remove
* Disconnect power steering hoses
* Disconnect brake servo vacuum hose from vacuum pump
* Remove engine wiring harness
* Disconnect heater plug harness from heater plug number 4
* Support engine with engine crane
* Remove engine earth strap
* Undo engine mounting rubbers top and bottom
* Raise engine, remove rubbers, lower back onto chassis mountings
* Remove starter and harness
* Remove all bell housing fixings
* Lift out engine
* Remove fuel filter from bulkhead but keep fixings
Work to do to Discovery
* Disconnect battery
* Remove bonnet
* Remove engine wiring harness from bulkhead
* Remove radiator assembly
* Disconnect cyclone hose from air cleaner hose
* Remove air cleaner hose from turbo
* Remove feed pipe/hose from turbo and intercooler
* Disconnect heater hoses from cylinder head and heater rails
* Remove bolt attaching breather pipe clip to cylinder head and move breather pipes aside
* Disconnect hoses from power steering pump
* Disconnect bypass hose from thermostat housing
* Release bypass hose from retaining clips on front timing cover
* Remove throttle cable from injector pump
* Disconnect feed pipe and spill return pipe from injector pump
* Disconnect both pipes from fuel lift pump
* Disconnect servo hose from vacuum pump
* Loosen exhaust downpipe at first connection
* Remove oil cooler pipes from oil filter adapter
* Disconnect ground strap from starter motor
* Support engine with engine crane
* Remove engine mount bolts
* Remove all bell housing fixings
* Lift out engine (I withdrew from front by angle grinding the front centre panel out of the Discovery)
Work To Do to 200TDi While Removed
* Remove flywheel cover and fit old TD flywheel cover. This avoids having to cut and retap studs in different positions
* Change the rear crank oil seal if any signs of leaks. Only use a genuine Land Rover one as its much better quality than the others
* Fit a new clutch. I found that one of the small spark plug spanners is perfect as a clutch alignment tool
* Fit new oil filter
* Replace rocker cover and sump gaskets
Work To Do to 90
* Fit a new clutch release bearing
* Fit a heavy duty clutch arm
* Remove exhaust front section
* Move clutch pipe mount from corner of bulkhead 6 inches across to the right
* Clean up engine bay and protect exposed chassis areas while you have easy access
* Cut down bottom radiator mount brackets by 3cm - Angle grind tops off, cut 3cm from height, reweld tops back on
* Hoist engine into position
* Line up bellhousing studs and attach all fixings. You may need to adjust angle to do this which can be done by an adjustable engine lifting bracket. I did it by jacking up the gearbox end
* Connect starter motor wires and connect earth lead to chassis
* Connect exhaust heat shield
* Fit engine mount rubbers
* Prepare to fit TD loom onto engine by noting colours of wires and positions of 200TDi loom.
* Remove 200TDi loom and secure TD loom to engine. All the colours are the same so connect as the 200TDi loom was. The only change is to the alternator where you cut off the connector block and use spade terminals instead; the thin white wire is no longer used
* Attach and adjust the Discovery throttle cable
* Fit the intercooler top and bottom pipes to the engine
* Fit the extended oil cooler pipes. I secured mine with a bracket as they were longer than anticipated
* Fit the internal heater pipes (steel pipe feeds rear, pipe nipple feeds front) using the old ones from the Discovery
* Fit a new temperature sensor to match the TD gauge. Depending on your old TD engine the sensor from that may fit but there are two different types so not always. Mine didn't so the temperature gauge reads just under red when it should actually be in the centre
* Fit the power steering pipes. I used the low pressure one from the TD and the high pressure one from the Discovery. The TD one still fits the bracket on the rear of the crossmember but the Discovery one is the wrong shape so you need to make a bracket to secure it to the chassis rail
* I left the header tank from the TD and used the TD radiator pipe. The bottom engine connection is slightly kinked so adjust as best you can. The smaller pipe from it that goes to the header tank needs to be extended so I used part of the old Discovery pipework and a piece of standard copper heating pipe to join the two with small jubilee clips
* Fit top radiator water pipe. I used a cut down pipe from the Discovery for this
* Fit the 200TDi fuel filter to the bulkhead (this system is simpler than the TD). You will need to extend the existing fuel hoses with 8mm id (internal diameter) fuel pipe and small jubilee clips
* Fill the PAS header tank
* Fill the water tank
* Check the oil level of engine and fill correctly (especially if you drained it all out earlier!)
* Prime the fuel system with the hand pump on the lift pump.
* Disconnect the fuel solenoid wire temporarily
* Reconnect the battery
* Turn the engine over with the ignition key which should prime the fuel and oil systems.
* Reconnect the fuel solenoid wire
* Turn the engine over with the key and this time it should fire up if all is correct!
* Check for any leaks anywhere or strange noises!
* Let the engine run up to temperature and double check for leaks again
* Mount and fit the exhaust to the downpipe
* Use the old TD air filter system and using a combination of pipes from the TD and Discovery you can just get it all to fit together
* Test that the clutch and transmission is all working. You will probably need to bleed the clutch which will have lost fluid when fitting the new clutch arm
* Refit bonnet, bumper etc
* Test drive and make any necessary minor tweaks!
CONVERSION DONE :)
Post Conversion Tweaks
* I found the turbo whistle was louder than expected. This turned out to be the top turbo hose that needed tightening up.
* Although acceleration was much improved I still found the engine lacking at the top end. This turned out to be the accelerator cable needing adjustment (in the cab) as it was only opening to about 75% of full throttle.
* After a week or so the alternator and power steering belts needed adjusting again as the new ones had slightly stretched once bedded in.
Other Information
This was the first time I’ve ever changed an engine never mind doing a conversion from one engine type to another. I’m no mechanic by any stretch of the imagination but with a half decent collection of tools, a double garage to work in, and lots of advice I managed ok so I reckon most other people could. It was a great learning experience too so I highly recommend it!
I approached the job logically and did LOTS of reading up on the web and asked advice when needed on www.landyzone.co.uk which was invaluable. I loosely based my conversion on the excellent thread by Patman on Landyzone.
Share this blog...
Monday, 30 November 2009
Wednesday, 10 June 2009
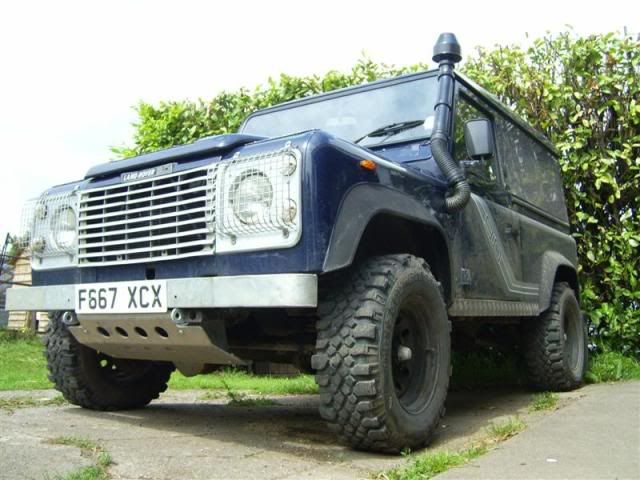
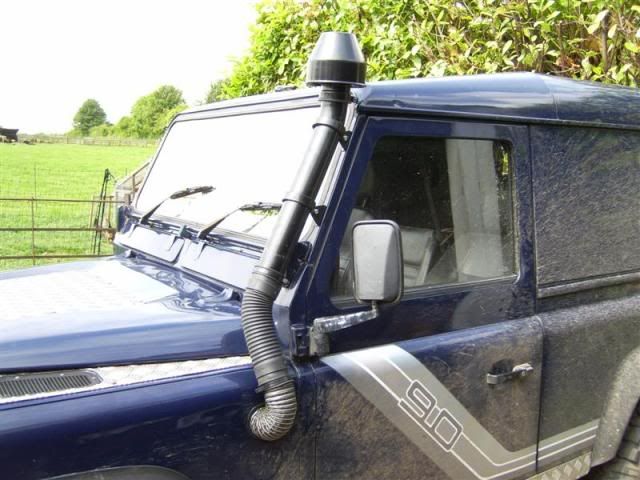
Snorkel Fitted
Well today I got round to completing the fitting of my snorkel. What I had hoped would be a simple straightword job according to the instructions turned out to be a real pain - much like everything else seems to do!
The first step in the installation instructions said to remove the vent cover on the passenger side wing. On my Landy there isn't a vent on either wing :( It turns out that at some stage in its life it has had a new wing which must have been replaced with one from a NA or V8 which don't have the vent -grrrrr!!! Because of this none of the pipework was right and I had to tackle it a whole different way...
In the end I bought a length of air duct tubing which I ran direct from the air filter all the way to the inside of the wing behind the heater box. I then had to cut a hole in the wing which was finished with kitcar edging to help stop any chaffing and then up to bottom of the snorkel pipe.
I got there in the end (over a period of days having to wait to source parts etc) and am pretty happy with the end result.
Cheers
Richard
The first step in the installation instructions said to remove the vent cover on the passenger side wing. On my Landy there isn't a vent on either wing :( It turns out that at some stage in its life it has had a new wing which must have been replaced with one from a NA or V8 which don't have the vent -grrrrr!!! Because of this none of the pipework was right and I had to tackle it a whole different way...
In the end I bought a length of air duct tubing which I ran direct from the air filter all the way to the inside of the wing behind the heater box. I then had to cut a hole in the wing which was finished with kitcar edging to help stop any chaffing and then up to bottom of the snorkel pipe.
I got there in the end (over a period of days having to wait to source parts etc) and am pretty happy with the end result.


Cheers
Richard
Friday, 1 May 2009
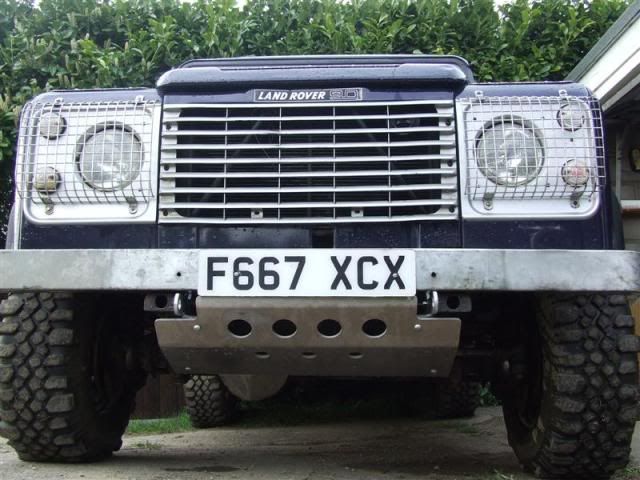
Fitted steering guard
For my birthday I received a snorkel from my fiance and a heavy duty aluminium steering guard from my parents - how well do they know what I like :)
After about a minute I discovered that the snorkel wouldn't fit :( My TD Landy doesn't have a TD nearside wing for the air intake which is where the snorkel fits. That's now a job for another day that will involve cutting holes in my Landy and some jiggery pokery!
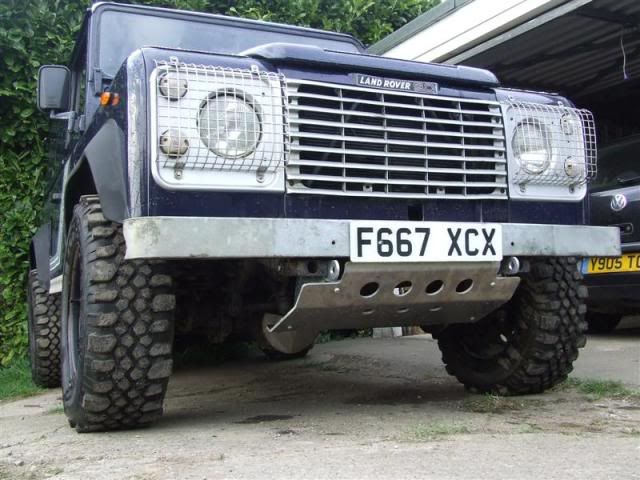
I then went about fitting the steering guard which had it's own issues. It is a 3 piece type guard which are easier to fit but as I have an A bar then it wouldn't fit as the A bar hangs too low and obstructed the guard. In the end I decided to remove the A bar and relocate the number plate as I prefer the look of the guard.
And here it is!
After about a minute I discovered that the snorkel wouldn't fit :( My TD Landy doesn't have a TD nearside wing for the air intake which is where the snorkel fits. That's now a job for another day that will involve cutting holes in my Landy and some jiggery pokery!
I then went about fitting the steering guard which had it's own issues. It is a 3 piece type guard which are easier to fit but as I have an A bar then it wouldn't fit as the A bar hangs too low and obstructed the guard. In the end I decided to remove the A bar and relocate the number plate as I prefer the look of the guard.
And here it is!
Thursday, 23 April 2009
Front hubs
After 2 of the drive member bolts shearing and the other ones looking likely to do the same I didn't want to risk spending a day trying to sort out out myself due to a lack of time! I asked my local mechanic to sort it out for me and also take a look at the front o/s hub as it sounded like the bearing was making a noise.
He managed to sort out the sheared bolts etc for me and discovered that the o/s front bearing was completely shot and had welded itself to the hub!!! Anyway, new bearing fitted and all is well again now :)
He managed to sort out the sheared bolts etc for me and discovered that the o/s front bearing was completely shot and had welded itself to the hub!!! Anyway, new bearing fitted and all is well again now :)
Sunday, 5 April 2009
Grrrrr, not more sheared drive member nuts!!!
After the nightmare I had getting the rear nearside drive member nuts off I thought I better do some preventative maintenance and remove and coppaslip the fronts too. The offside front ones came off no problem and were greased, replaced and torqued up (65). The nearside ones weren't quite as easy and I only managed to remove two of them. Even after blasting them with WD40 and giving them some heat they wouldn't budge and when I put my large breaker bar on them I managed to shear 2 of them off so far - not good!
Looks like I'll be stripping down and rebuilding the front hubs etc now too, arghhh!!!
Looks like I'll be stripping down and rebuilding the front hubs etc now too, arghhh!!!
Saturday, 4 April 2009
Rear bump stop and reverse light switch
The reverse light stopped working a couple of days ago which made it "interesting" reversing down our dark lane to the garage at night. It would come on as you put it into reverse and then go out virtually straight away. I looked up how it works and there is just a switch that screws into the top rear of the gearbox. This is dead easy to get to by removing the middle seat cushion section and unscrewing the cover beneath that. It just required another full turn clockwise into the gearbox housing and now works perfectly again :) While I had the cover off I used the opportunity to give the handbrake mechanism a good clean and grease too.
I noticed that the rubber from the offside rear bump stop was missing so thought I better replace it. I got the new part (basically a big chunk of rubber moulded to a metal bracket) and hoped it would just be a case of unbolting the old one (just the rubber was missing)... I managed to get both bolts half undone but as they are well rusted on and with a socket on the bottom and open ring spanner on top (can't get anything else on) I can't get enough pressure to remove them anymore :( Looks like a job for the angle grinder when I have time to attempt it again!
I noticed that the rubber from the offside rear bump stop was missing so thought I better replace it. I got the new part (basically a big chunk of rubber moulded to a metal bracket) and hoped it would just be a case of unbolting the old one (just the rubber was missing)... I managed to get both bolts half undone but as they are well rusted on and with a socket on the bottom and open ring spanner on top (can't get anything else on) I can't get enough pressure to remove them anymore :( Looks like a job for the angle grinder when I have time to attempt it again!
Friday, 3 April 2009
Back in business :)
Well today I managed to get hold of some replacement driver member bolts. They were a pain to get hold of though as 3 local Landy places (including main dealer!) didn't have any in stock!!! In the end I got some off an old axle one of the Landy garages had laying around :)
So now everything has been rebuilt so let's just hope the lock up problem doesn't reappear!!!
So now everything has been rebuilt so let's just hope the lock up problem doesn't reappear!!!
Tuesday, 31 March 2009
Rear axle all back together :)
Typically I hurt my back on Saturday morning so couldn't do anything to the Landy over the weekend :(
Anyway, I got under it today and have rebuilt both rear brakes (and freed off the stuck adjusters, cylinders etc) and got the new outer bearing seal fitted (damaged the old one removing it to check bearing). Then I got both half shafts back in and rear hubs reassembled and fitted so all sorted now.
The only thing left to do is to get some replacement drive member bolts as 4 of the 5 sheared when removing them and my local Landy place didn't have any.
Friday, 27 March 2009
Diff back in, prop back on
I hadn't had chance to do any work on the Landy until today but had got the new prop bolts so at least got the diff back in and propshaft back on today. More work over the weekend and we should be back in business!
Saturday, 21 March 2009
Diff removed and checked
Well I decided that I may as well completely strip the whole rear axle down so at least I know the state of everything...
I'd already removed the drivers side wheel, drum, hub assembly and half shaft without too much bother so thought I'd do the same with the passenger side. Unfortunately this didn't appear to have every been off before and 4 of the 5 drive member bolts sheared off as soon as I gave them any welly :( This then took 2 of us nearly 4 hours to remove :(((
Anyway, got that off and checked all that side. It seemed fairly ok but the brake cylinder did appear siezed on one side. The half shaft etc was then removed on this side too so we could take the diff out.
The diff was fairly easy to remove as it just needs the rear prop bolts to be undone and prop moved out of the way. The bolts were pretty knackered though so I'll have to get some new ones that aren't rounded! Then there are just a load of bolts around the diff housing which came off without any bother once cleaned up. After that then the diff just came straight out and we checked it on a bench and all was well with no real wear on it at all.
Now I'm completely confused as there doesn't appear to be any real reason for the lock up which is worrying! At least I now know how everything works on the rear axle and have cleaned, adjusted, and renewed bits where needed - just have to put it all back together when I get some new parts...
Thursday, 12 March 2009
Rear diff oil
I've just drained the rear diff oil to check for bit of metal that may have broken off diff and it is fine. I only put new diff oil in a month ago, have only been in any water once since then and that was only half way up the wheels - I have axle breathers anyway which seem to work as the oil is just as good as it was when it went in. More importantly I've had a poke around inside and there aren't any bits of cogs/metal at all - everything seems fine... grrr....
Wednesday, 11 March 2009
Rear brakes/bearings check
Ok, taken it all to bits using the guide at Rear wheel bearings renewed to try find the problem...
It looks like the brakes are all fine, nothing loose, nothing jammed etc and even the shoes are ok... I then dismantled the hub and removed the bearings (what a pain that was!) and they are both fine too!
I thought I better get a second opinion as I'm no expert by any stretch of the imagination so I chucked all the bits in a bag and have just been to see my local friendly Landy garage.
He says that the brakes are fine and the bearings are too. The only thing he can think of is the diff now even though he said he'd have expected both wheels to lock if that was the case.
Anyway, next job is to drain the rear diff oil and see if any bits of metal come out...
Scary moment!
I was just coming home and as I was approaching a roundabout at around 50mph I began to slow down and the rear drivers side wheel locked up completely!!!
I managed to keep it pretty straight considering and luckily there were no other cars nearby to worry about. Once I'd stopped I got out and had a look but couldn't see anything obviously wrong (wheel on it's side or anything) but just a mahoosive black tyre mark on the road about 100 yards long. I got back in and tried to move it forwards but could feel the wheel still locked. Thought I better move it to the very edge of the road so started dragging it and it freed off. As I was only a mile from home I limped back carefully at 25 mph (it drove fine) and it is now in my garage ready for inspection.
All I can think is that something has broken in the rear drum, jiggled its way about, and then jammed the drum and caused the lockup.
Saturday, 28 February 2009
A bar repainted
On Friday night I removed the bumper and A bar and repainted the A bar with smooth black Hammerite. Then on Saturday I refitted the grille, the bumper and A bar. It doesn't look too bad but could do with another coat while in situ as a couple of spots got marked etc when refitting :(
Wednesday, 25 February 2009
Bonnet cable
Well today I went to my local Landy specialist and picked up the screw nut for the end of the bonnet cable. I'd thought about using a choc block electrical connector but that would have been a bodge and I wanted to do it right! Anyway, all fitted in a couple of minutes and I now have a bonnet that can be opened from a lever inside instead of the piece of the rope I was having to use poking through the grille!
While I was at the garage then I also bought a rocker cover gasket in anticipation of adjusting the tappets sometime soon as they are making quite a noise.
While I was at the garage then I also bought a rocker cover gasket in anticipation of adjusting the tappets sometime soon as they are making quite a noise.
Tuesday, 24 February 2009
New bonnet release cable
To get to the bonnet catch I had to remove the A bar and the front bumper. The front A bar needs repainting anyway as the black spray didn't key to it last time I tried to paint it and is peeling off in chunks - especially after the day offroading through mud etc. This time it is going to get a coat of smooth Hammerite which should stay put!
After removing the A bar and bumper the front grille was removed so I could fit the new bonnet cable. Old cable came straight out but was a pain to remove old broken bolt in cabin where the bonnet pull should go (was broken). New cable fitted and run through but there isn't a proper connector to attach this to the latch :( I'll have to get one tomorrow now before I can refit everything...
After removing the A bar and bumper the front grille was removed so I could fit the new bonnet cable. Old cable came straight out but was a pain to remove old broken bolt in cabin where the bonnet pull should go (was broken). New cable fitted and run through but there isn't a proper connector to attach this to the latch :( I'll have to get one tomorrow now before I can refit everything...
Monday, 23 February 2009
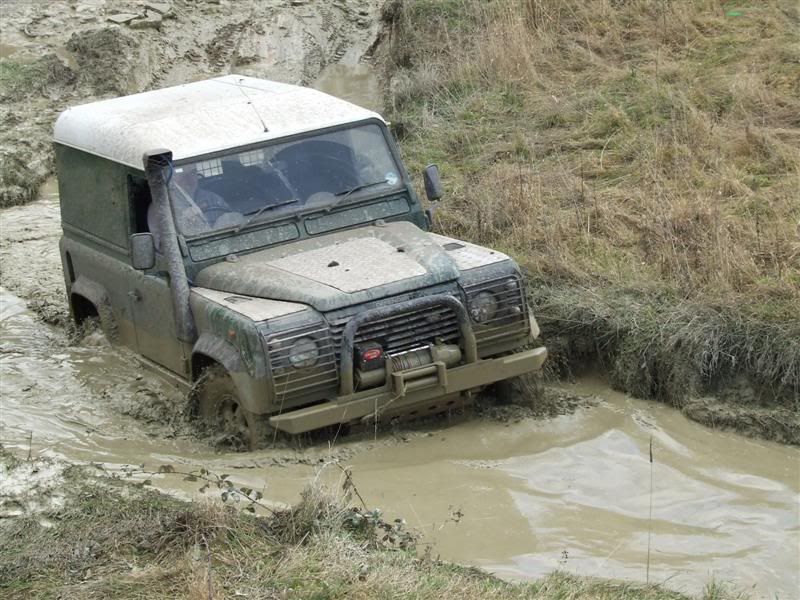
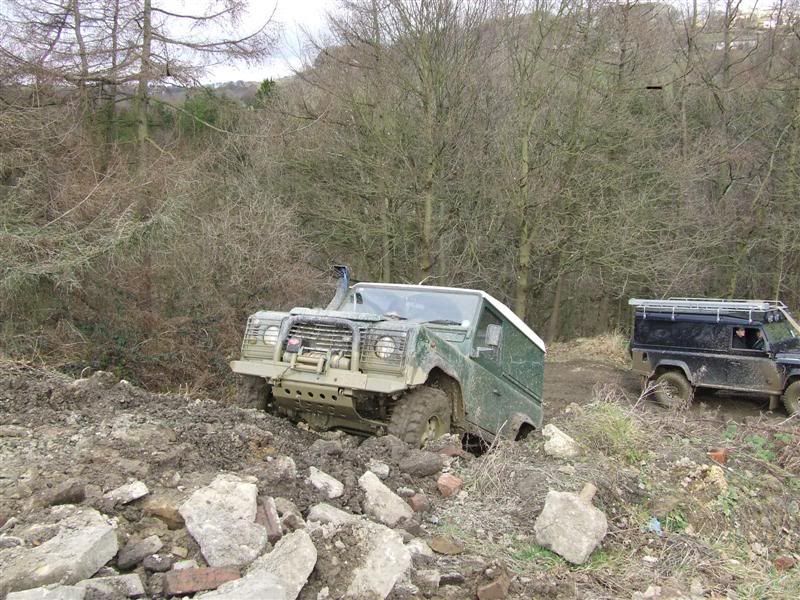
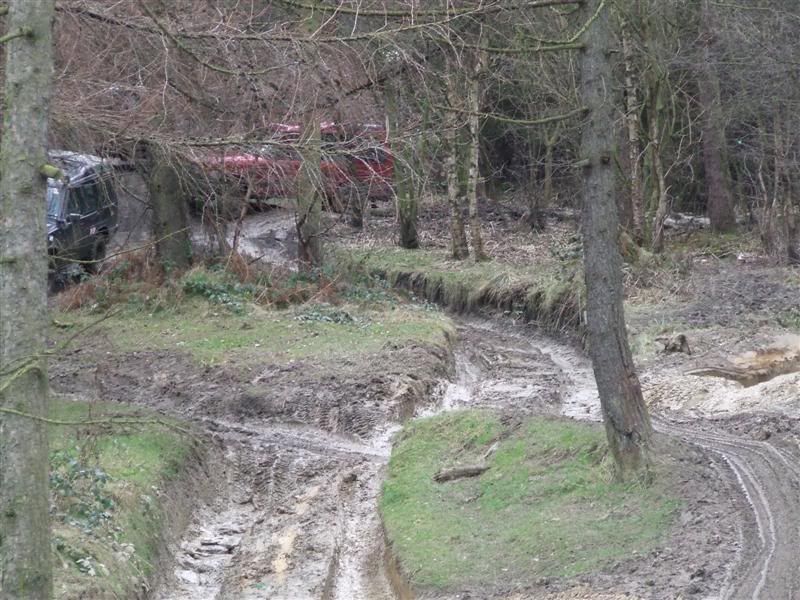
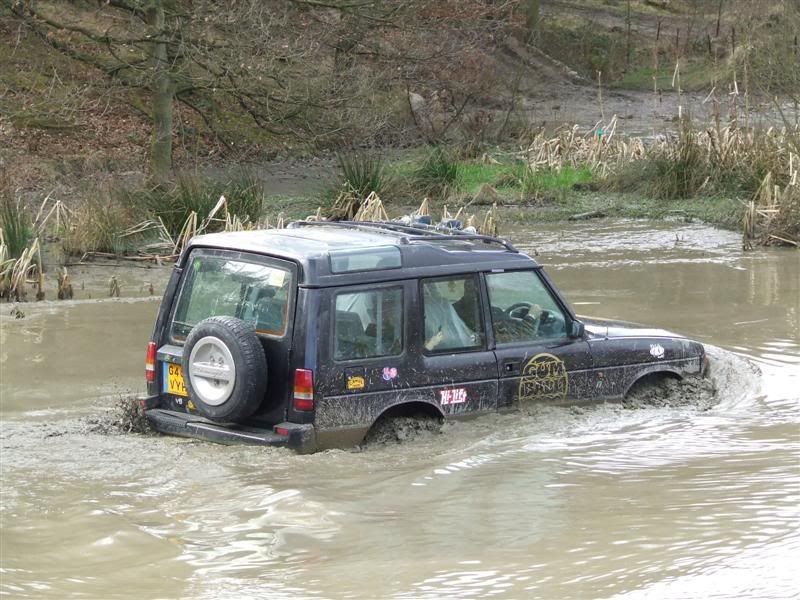
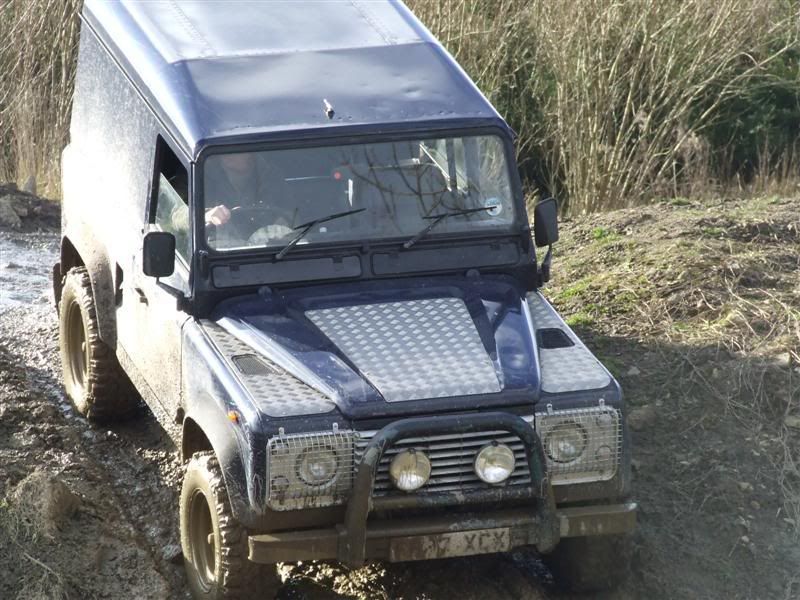
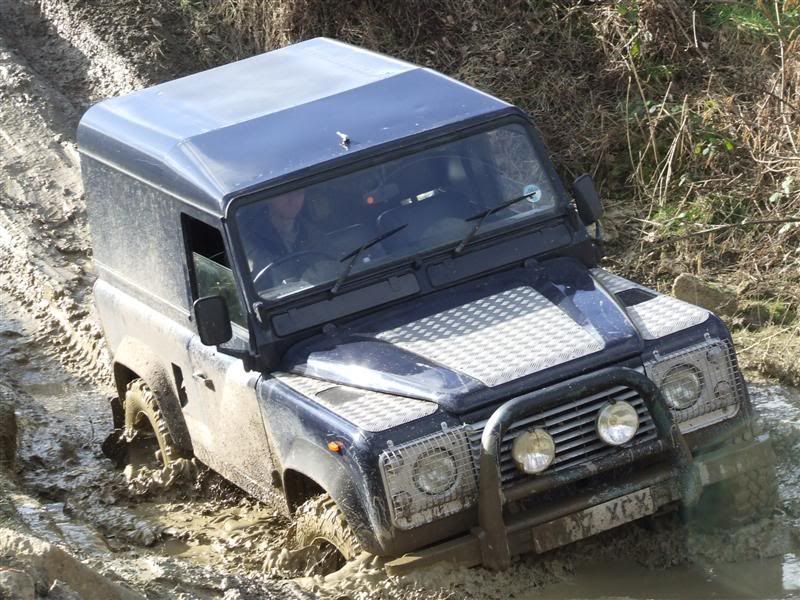
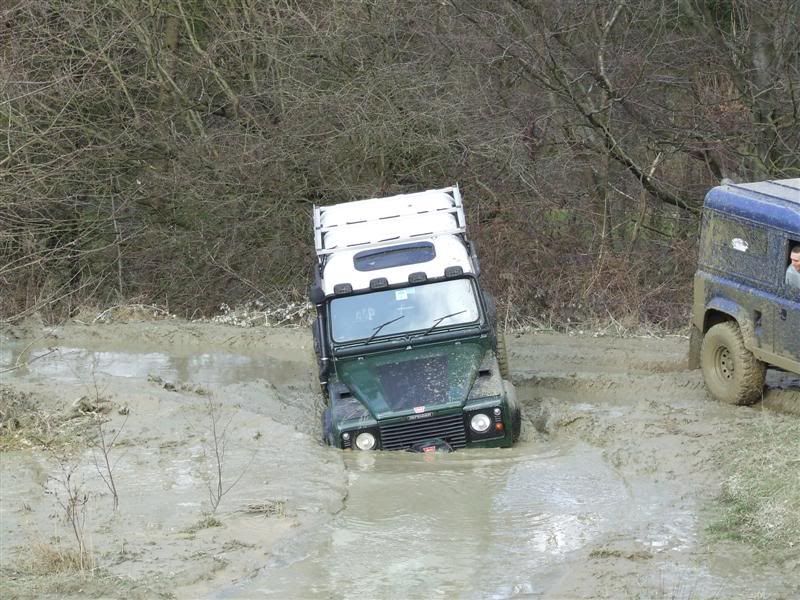
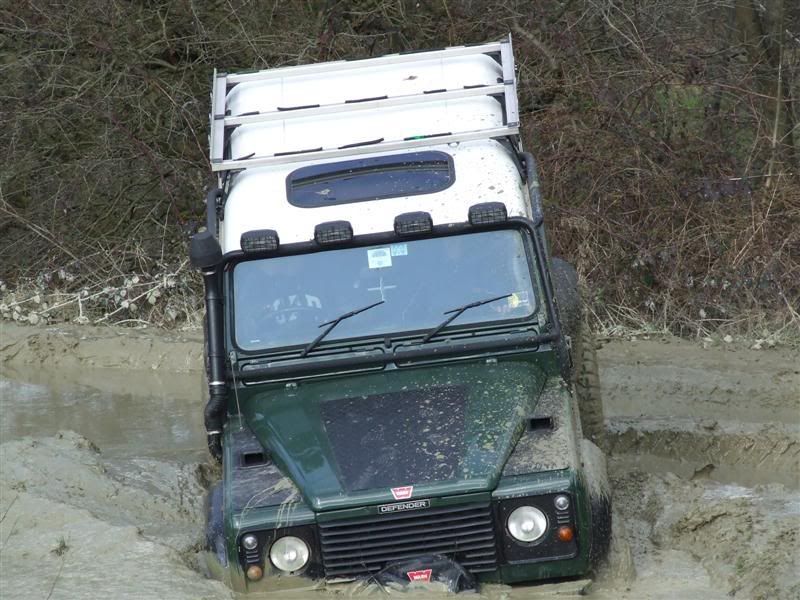
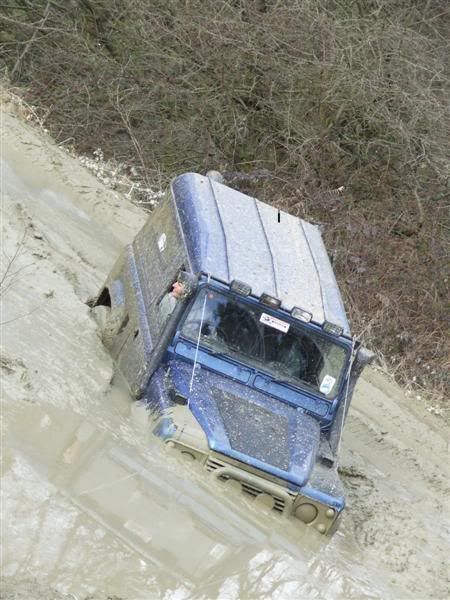
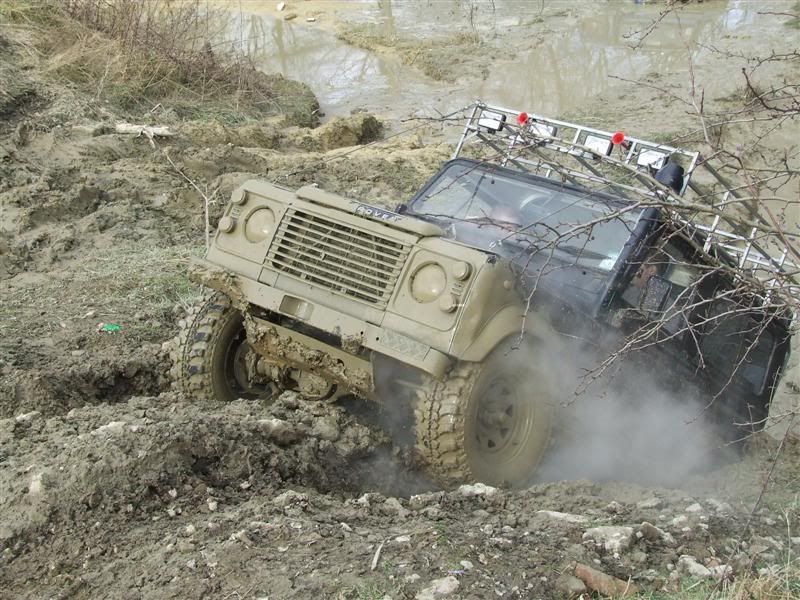
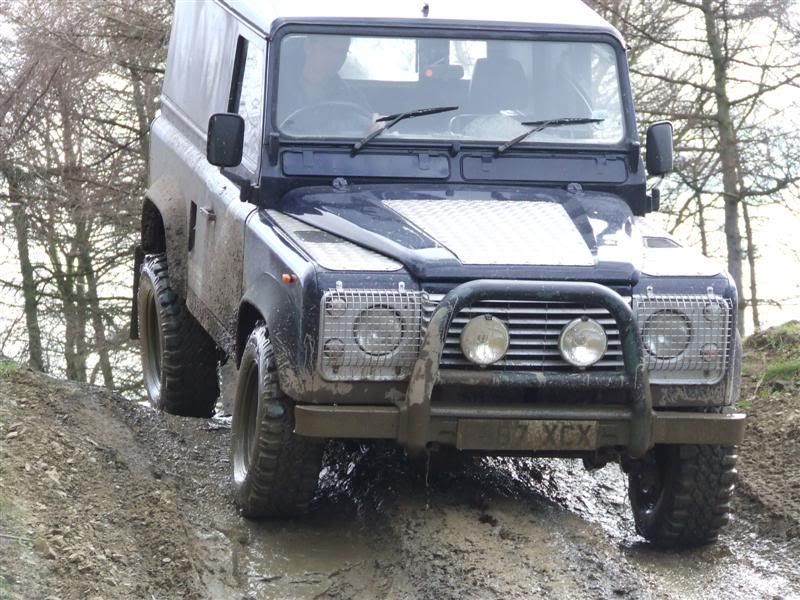
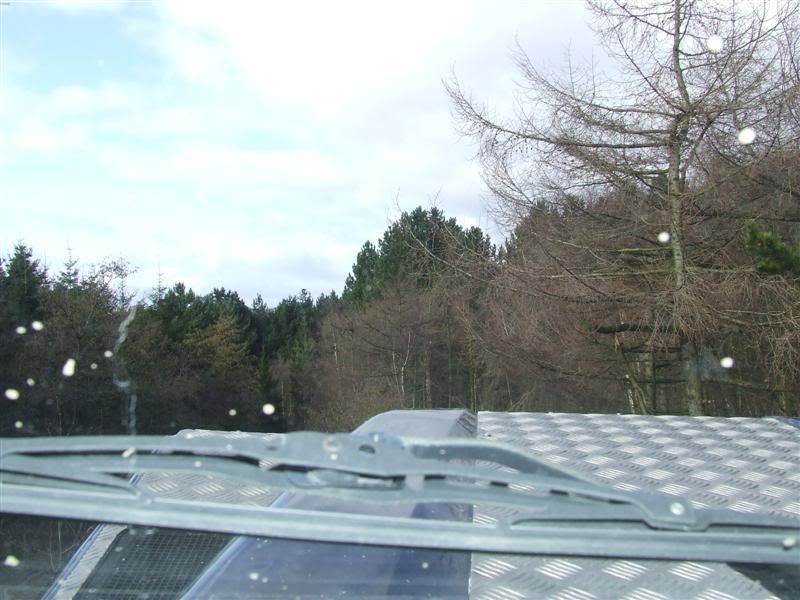
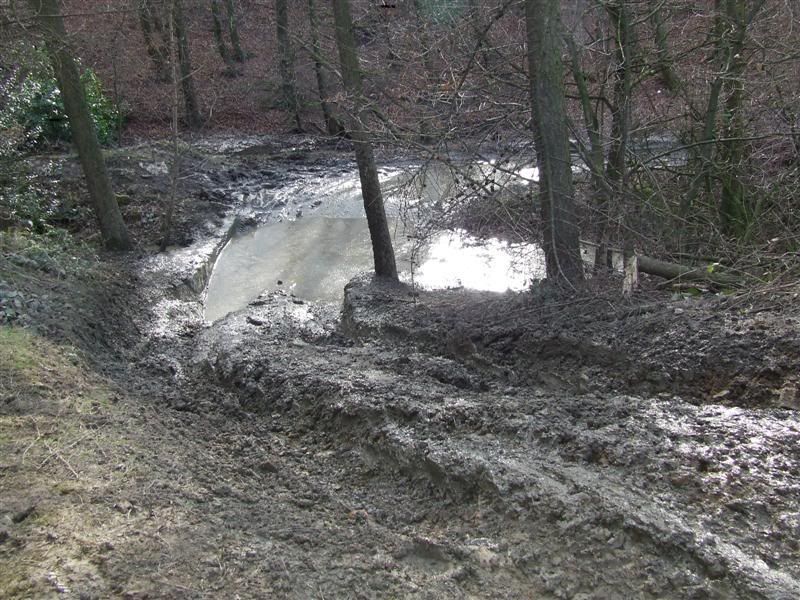
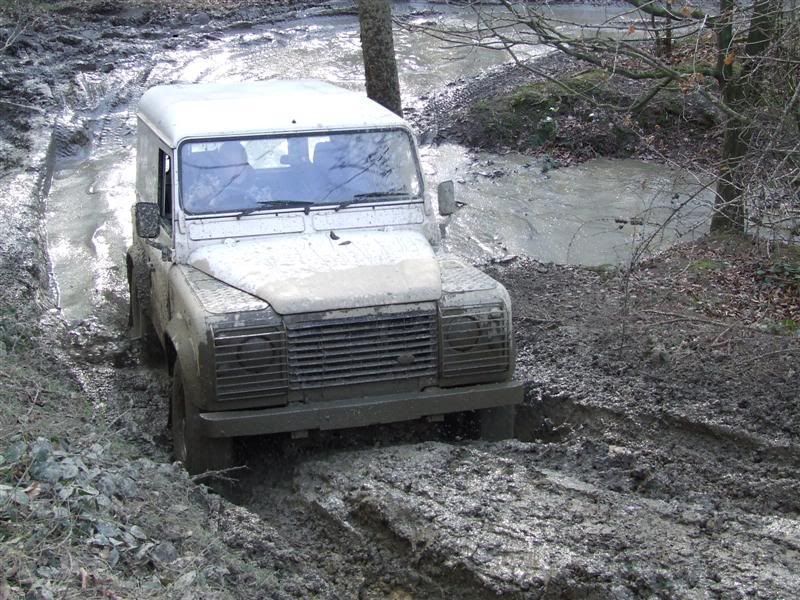
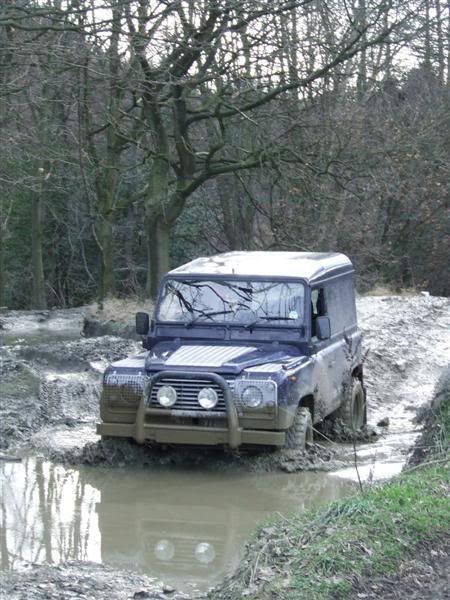
Parkwood (Tong) off road day
Day out offroading at Parkwood which is in Tong, near Bradford, West Yorkshire. Had a great time and can't believe some of the stuff the Landy can do!!! I started off quite sensible until I knew what I was doing. By the end of the day though I was going up/down stuff that other people couldn't manage and we'd thought were impossible in the morning :)


Sunday, 22 February 2009
Bits and bats
After the problem of not being able to get the wheel nuts off before I thought I better coppaslip them all which I did. I also greased all the UJ's and took a look at the minor power steering leak. It looks like it is just the seeping from the drain plug/washer rather than the front seals so I'll have to remove and replace them soon to avoid leaving small puddles of power steering fluid on the garage floor!
Thursday, 19 February 2009
More heater problems - new thermostat
More heater issues! Even though the fan was blowing on both speeds my Landy had never really got that warm. Having got hacked off with this and thinking that the temp gauge never moving more than a couple of mm was wrong I thought I better do something about it.
I thought I'd replace the thermostat first off as they are cheap and easy to do and then give the whole system a flush if that didn't work. Imagine my surprise when I removed the thermostat housing and found nothing but water in there - there was no fricking thermostat fitted!!!
Anyway, the good news is that now it actually has a thermostat it warms up quickly and sits dead on centre of the temp gauge whether in traffic or on a run. Even better than that is that the heater is now half decent :)
Sunday, 15 February 2009
Hot start problem solved
Hot start problem. My Landy has been starting great when cold - I just give it 20 seconds glow plug preheater and don't touch the throttle until it fires which is normally a couple of turns. I had been worried about switching it off though as warm/hot starts seemed to take forever. I'd been out for about 4 hours (not switched car off at all) and then switched off to refuel. Got back in and it took ages to get going, was really worried it wasn't going to go at all!
Anyway, having read about somebody else having a similar problem and it being a blocked banjo bolt hole on the fuel filter I decided to take a quick look at mine. I removed it easily enough and in the side of the bolt there was what looked liked a tiny tiny hole that I couldn't even tell if it was blocked. My local Landy guy had mentioned before that these should ideally be drilled out to 1mm as apparently these engines run much better with that done. Armed with a drill and 1mm bit I did the mod and refitted the bolt. The Landy was cold and fired up fine as usual, phew!
I then left the car running for about half an hour until it was warm and switched off again. Crossed my fingers and tried to restart it and amazingly it fired up after half a turn It now consistantly starts straight up when warm with no preheater or throttle at all - fantastic!
Who would have thought such a simple thing would make such a huge difference!
Monday, 9 February 2009
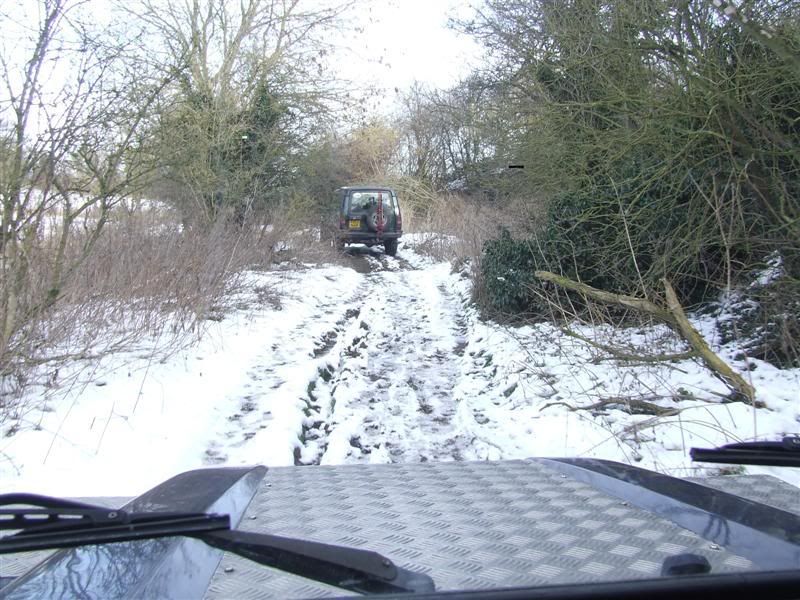
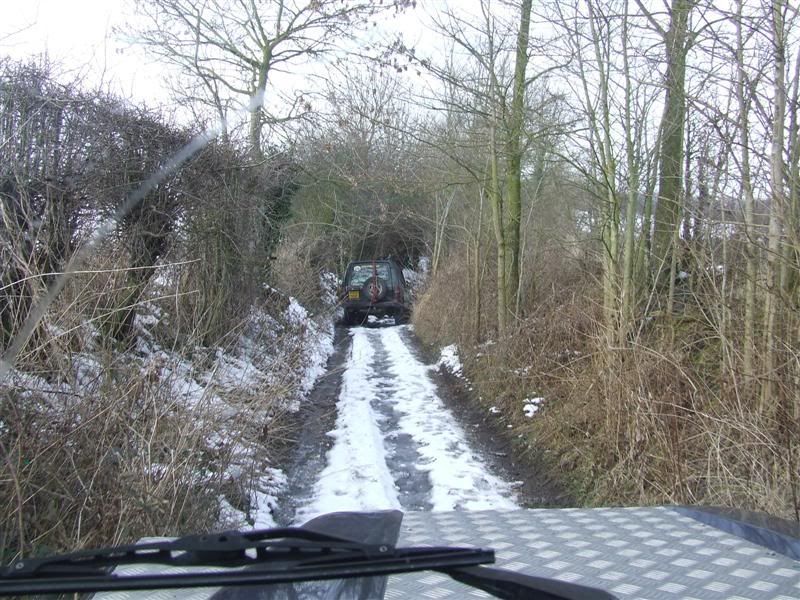
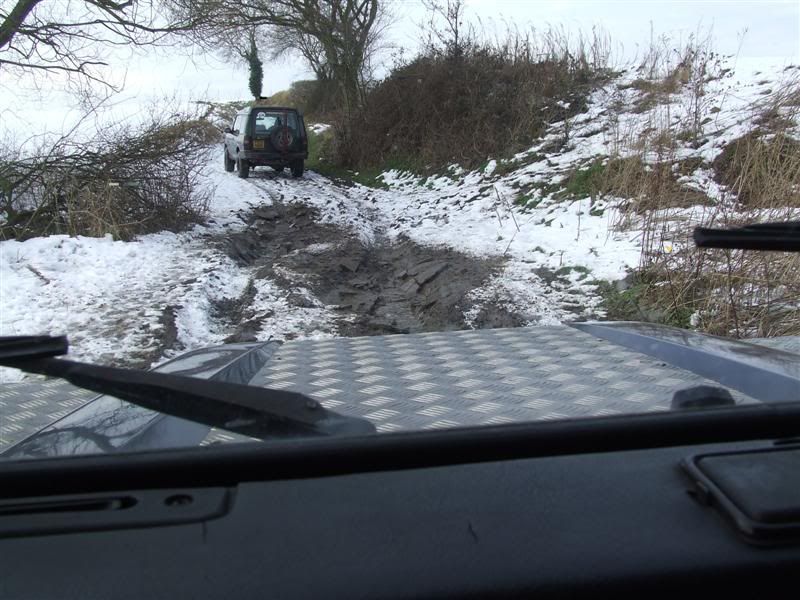
Day out greenlaning
Day out "beginners" greenlaning - Maltby to Retford to Bawtry :) Great fun on a sunny frosty day but picked up a few scratches along the way on a couple of the tighter lanes. Didn't have to use low box or diff lock at all even on the slippy stuff!


Sunday, 8 February 2009
New offroad wheels/tyres, jate ring, and alternator belt
I just wasn't right to still be running standard wheels that had been painted white with thin standard tyres! I managed to find someone breaking a Discovery off roader fitted with black modular wheels and 235/70/R16 Grizzly Claw offroad tyres. We did a deal and they are now fitted to my Landy - much better :)
As I'm going off roading tomorrow I thought I better make sure that I had decent recovery points front and rear "just in case". At the rear I have a pin style towbar so that is fine for the rear but at the front I have now fitted a jate ring on the front right hand chassis rail. As I tried to remove the standard recovery eye the old bolt head snapped off which at least meant I could just push the bolt stratight through and not have to undo the whole bolt thread ;)
Alternator belt - I noticed that the alternator belt was frayed so got a new replacement. Having had a look then my first thought were that it was going to be a right pain to fit as it is behind the power steering belt and looked like the fan etc would all need to be removed too. As it turns out it took less than half an hour to do :) Here is how I did it - Slackened off the alternator with the front and back alternator bolts and the two that adjust its tension. Slackened off the three bolts holding the power steering pump on and removed that belt. Slipped the alternator belt off the pulleys and then eased it over the fan so it could drop off. Then just did the opposite to get the alternator belt back over the fan (one blade at a time) until it was fully over. Then replaced PAS belt and tensioned it while tightening the pump mounting bolts. The most difficult bit was getting the new belt over the pulleys but I think that was because the alternator hadn't fully retracted on it tension adjusters.
Friday, 6 February 2009
Removing wheels
I hadn't had the wheels off the Landy since I got it so thought I better try getting them off to make it easier in future. It's a good job I did as they were rock solid and the wheel nuts had been painted over! I managed to move a couple using a 6 foot bar but in the end I managed to snap a socket extension as one was so tight!!! Rather than risk any further damage I took it to my local friendly garage where he did me the favour of loosening them using his snap on truck wrench :)
Heater fan fixed :)
Heater now fixed! :) Last week I tested the fuse (think it is 3rd one up from bottom on left hand column) and it was fine, even tested that 12v was there so had ruled this out. I just went to investigate how to bypass it as I was going to wire a switch directly to fan motor for now. Luckily I decided to double check the fuse and as I moved it then the motor came to life! After all this it was just a dodgy connection in the fuse holder! Connector cleaned up, fuse replaced, and I now have a working heater, even on both speeds!
Tuesday, 3 February 2009
More heater fan fun
Been investigating heater problem - The resistors are actually fitted in the heater box under the bonnet rather than the switch and is basically the box where the wires go in that's pop rivetted on. To change them is a faff as you need to drill them out and access isn't great. Thinking of hard wiring the switch in directly so heater is just on or off!
Thursday, 29 January 2009
No heater
The heater fan doesn't work though I'm pretty sure it worked the other day but only on the fastest setting. I'm guessing it is either the switch or burnt out resistors (if the Landy is like other cars I've worked on) as fuses are all ok.
Saturday, 24 January 2009
It's alive! :)
Today I decided to give it one last try before calling in an expert! I bled everything from scratch - first of all the banjo bolt on top of fuel filter, then the CAV pump, and then cranked each injector while turning over. Battery was fully charged and it fired up after about 10 seconds cranking, yippee!!!
Thursday, 22 January 2009
Nope, still not running!!!
I put the batteries on charge again last night thinking it would be fine with strong batteries today but nope. I didn't even get a fire out of the bloody thing today!
Still won't start :(
It STILL won't start despite lots of messing about with pumps and pipes!
Basically it wasn't just the union going into the lift pump but the threads were fubar'd and it was leaking. My local Landy specialist didn't have a used pump so I had to buy and fit a whole new lift pump which I did without too much trouble. Even though this meant removing the existing studs and replacing with longer ones and an adapter as they don't make the old style pumps any more.
I then filled the fuel tank with a jerry can's worth of extra fuel (so now over 1/2 a tank) and pressurised it from the fuel filler using a rag and air compressor. Fuel then came out of the disconnected fuel pipe that goes into the lift pump which was then secured and I hand primed the pump until it came out of the lift pump outlet. All pipes were then secured back on again and bled as people have said above. I tried to start it and eventually it did fire up for a few seconds but then died. This happened a couple of times until the battery (and then booster battery) died on me.
Monday, 19 January 2009
Starting problem
Went out to the garage to try again... I loosened the bleed nipple but bob all was coming out of it when manually (or cranking the engine with starter) using the lever on the fuel pump. I then went back through the fuel system from the end at the injectors all the way back to the pipe that goes from the fuel pump to the fuel filter. Even when I pumped this I didn't get any fuel out of the top of the pipe!
Eventually I took off the connector that goes from the fuel tank to the fuel pump and nothing came out even when hung on the floor (below the fuel tank). I sucked this through to get rid of the airlock (which I don't know how got there so far back in the system anyway) and then re-attached the pipe to the fuel pump. When the pump is manually pumped then I can hear it trying but I don't think the connector is sealing as nothing is pumped through and if I put my fingers around it I can feel/hear air escaping from it. All I can think to try now is to get a new pipe/connector that goes from the fuel tank into the fuel pump (presume a dealer only part?) and see what happens then...
Eventually I took off the connector that goes from the fuel tank to the fuel pump and nothing came out even when hung on the floor (below the fuel tank). I sucked this through to get rid of the airlock (which I don't know how got there so far back in the system anyway) and then re-attached the pipe to the fuel pump. When the pump is manually pumped then I can hear it trying but I don't think the connector is sealing as nothing is pumped through and if I put my fingers around it I can feel/hear air escaping from it. All I can think to try now is to get a new pipe/connector that goes from the fuel tank into the fuel pump (presume a dealer only part?) and see what happens then...
Sunday, 18 January 2009
Big service day
Big service day! Drained off old oil and removed the oil filter (located back left of the engine), fitted new oil filter and filled with new oil.
Replaced the air filter with a new one - again, nice and easy.
Replaced the front and rear diff oils. Removed the fill plugs first to make sure I didn't end up with drained diffs that had seized fill plugs ;) Drained it straight out (oil wasn't too contaminated) and refilled using an oil syringe.
Removed oil fuel filter and replaced with new one and new sealing washers. Landy wouldn't start after doing this :( Did some reading about it and realised I needed to prime the filter using the manual handle on the lift pump. I loosened the top and pumped the primer until fuel came out and then tightened that back up. I opened what I "think" is the bleed screw on the injector CAV pump and used the primer until fuel came out. I then tried cranking it and after quite a long time it fired up for about a second before dying straight away and now my battery is flat! :( Put in on charge overnight...
Saturday, 17 January 2009
Bought service bits
Went and bought lots of oils, filters etc ready for a full service the next day.
Friday, 16 January 2009
Bonnet pull and A bar
There was no bonnet release cable and was just a bit of chain hanging out of the front grille. This came off in my hand the previous night so I couldn't open the bonnet! I decided to attach a piece of rope as a temporary measure until I got a new cable. Typically this was a pain as I needed to take the grille off, to do that I had to take the A bar off, and to do that I had to remove the front bumper! While I had the A bar off I resprayed this black as the paint had peeled off in places showing a lovely green colour! I got all this done without too much fuss and attached a piece of rope as an external bonnet pull that ties neatly to the headlight guard :)
Thursday, 15 January 2009
Gearbox isn't dead!
Anyway, once in the garage and advice sought from http://www.landyzone.co.uk/ it turned out to be the handbrake of all things! The handbrake works on the transmission rather than brakes (basically uses a drum on the prop) and although fully off in the cabin, the connecting rod wasn't fully disengaging the handbrake. Once it was all cleaned up and greased then no problem anymore :)
Collected new Landy!
Collected new Landy. A 1989 Land Rover 90 with 2.5TD engine. Good original condition, excellent chassis, good bulkhead (just a couple of small 2p size holes). Pretty standard but with chequerplate bonnet, wing tops, sills, and rear corners. Rear light guards. Front light guards, foam A bar, spotlights (not wired in), and grille and headlight surrounds painted silver.
When driving home I had problems with real jerkiness when in 1st and 2nd gear. It felt like the engine was trying to escape it was that bad! I was really worried that it was gearbox related and I'd bought a lemon!!!
When driving home I had problems with real jerkiness when in 1st and 2nd gear. It felt like the engine was trying to escape it was that bad! I was really worried that it was gearbox related and I'd bought a lemon!!!
Subscribe to:
Posts (Atom)